DOT-s Tutorial 1 - Heatdistortion
|
This is a rather simple task, once you have a particle engine doing all the work for you. Heat distortion is caused by warmer layers of air raising from the ground. As these layers have different temperature they also refract lightrays in a different way. So what do we need to distort an image like hot layers of air would?
|
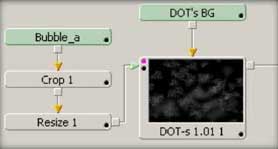 A particle that suits rather good for this task is bubble_a from the bubbles particle pack. All we need to do is to resize and crop it before we apply a softedged triangle mask. Make sure you set the Loader to Loop.
Let's create a black background with no alpha for DOT-s and connect the modified bubble as the particle. |
|
Let's set up DOT-s: We need the birthline at the bottom and a not too high bithrate (about 2.2). The orientation of the particles has to be adjusted to point upwards. To get rid of the uniformity we need to set the spread value to something like 0.3, speed variation to 0.5 and the rotation to about 2 degrees/frame. We can ignore gravity, so let's set that to 0. The particles should shrink too because the warm air would mix with higher layers thus the distortion is not so strong than it was on groundlevel. So let's shrink them with the behaviours for 100% of their life to the minimum. Set the "affect last %" to 0 to achieve that. It would be also nice to blur them a little over time with a value of 50. Set In/Out to 20/70%. Now it's time for the background image. We have to feed that into a deform tool with a very low value. About 0.2 would be enough. Almost done! |
Now connect DOT-s' output to the deform tool. It doesnt look so right? That's because we are applying the effect on the whole image. What we have to do is a quick mask for the foreground elements on the deform tool. Please adjust the mask's softness slider to achieve a smooth border. Let's invert the first one and set the second one to subtract.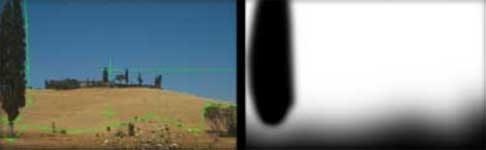 Render the final result. Almost satisfied? Go ahead and tweak DOT-s until you like it. Try with different particles! |