DOT-s Tutorial 2 - Jet Stream
If you take a look on the flow it looks rather complicated. In fact it isn't that bad. Basicly we have 3 Layers:
Put the plane in a loader and turn "postmultiply" on in the Import tab to get rid of the areas with no alpha. I accidently rendered it with the sky as background and was too lazy to turn it off for the final picture. DF to the rescue :-) |
|
Merge it atop of the sky. To add motion to the plane connect the center of Merge to another Shake. Set it's value to 0.41 and 0.51. This time we need a smoother motion than before, so smoothness should be around 16. Time for DOT-s! Create a black, no alpha BG for DOT-s. Then create another BG with 20x20 pixels. Set it to plain white with full alpha. Add a elleptic mask to the BG and set its softedge to 0.2. Width should be 0.75 and height 0.25. This way we can rotate it later in DOT-s without cropping the edges. Let's create our first stream. Connect the black BG to DOT-s and the small one as particle. |
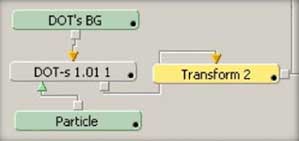 As we have rather small particles, we have to set the birtrate to 30. A lifetime of about 35 frames should be enough.
Further on with the forces: Adjust the spread to a real low value of about 0.008. Speed should be rather high with 0.04 and 0.25 for SpeedVariance. We don't need Gravity, so set this value to 0. Over to the Behaviours: Grow the particles in a little (10%) and out for 50%. Make sure both size values are at the minimum. You can later add fade and blur as I did in the flow, but this is just cosmetics. To get the stream connected to plane's engines, add another transform at the output of DOT-s. |
 Connect the XF's center to the Shake of the Plane's Merge. View that Merge while DOT-s is active. Adust the birthline so that the particles match one of the engines position. Go to the Forces tab and adjust the orientation to match perspective. If you started with the right engine a value of -164° is ideal.
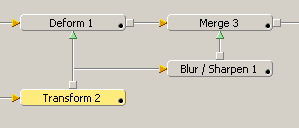
To add some heat distortion, place a deform tool after the XF of the sky and feed it with the output of DOT-s XF. Set the deform value 0.34 and place the center at the plane's tail. We need a little smoke too. So we create a merge after the deform tool and feed the foreground again with the output of DOT-s XF. This time we blur it before connecting. |
 As we need a smooth transition from the heat distorted sky to the white particles, we need to add a mask on the merke with a real big soft edge. You can apply any, I used a rectangular one with a softedge of 0.15.
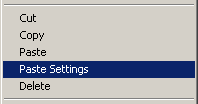
Almost done. The second engine is quite simple to do. Rightclick DOT-s and choose copy. Get a new DOT-s from the toolsmenu. DF will create the new one right after the first one. Rightclick and choose paste settings. Connect the particle BG tool to the second DOT-s. All you have to do is reposition the birthline and adjust the orientation a little to -158° for the left engine. You can add a lensflare and grain as a final touch if you like. |